Simple Notes app using React, TypeScript, Node.js, GraphQL and MongoDB
In the series of the blog post, I am going to walk through step by step process of building a Simple Notes App using React, TypeScript, Node.js, GraphQL , and MongoDB. During the process of our development, we are going to use some useful npm packages like Express, Apollo-Server, Typegoose, Mongoose, TypeGraphQL , and Bootstrap.
Here is the Github Source Code to run the application.
Table of Content
- Dev Environment Setup
- GraphQL Server Backend
- Folder Structure
- Creating Node.js project
- Configuring TypeScript
- Installing Dependency Packages
- Mongoose Schema and GraphQL Schema
- GraphQL Resolvers
- Mongo Database Setup
- Environment Configuration
- Node.js Server Setup
- Config files
- Running node.js / Server
Dev Environment Setup
We are going to set up our initial codebase and folder structure to get started. In this tutorial, I am going to use the Windows environment. The command structure is mostly the same and can be easily replicated to macOS.
Create a root folder called SimpleNotes. Underneath this folder create two subfolders client and server with a lowercase naming convention. We will use Visual Studio Code as the editor of our choice for this exercise.
mkdir SimpleNotes
cd SimpleNotes
mkdir client
mkdir server
GraphQL Server Backend
In this section, we will set up the backend GraphQL server connecting to MongoDB. Following is our folder structure for our server. All of the source code will be in the src folder. We created separate folders to store our models and resolvers.
Folder Structure
server/
 ┣ src/
 ┃    ┣ models/
 ┃    ┃    ┗ notes.model.ts
 ┃    ┣ resolvers/
 ┃    ┃    ┣ types/
 ┃    ┃    ┃    ┗ notes-input.ts
 ┃    ┃    ┗ notes.resolvers.ts
 ┃    ┗ index.ts
 ┣ .env
 ┣ apollo.config.js
 ┣ nodemon.json
 ┣ package-lock.json
 ┣ package.json
 ┣ schema.gql
 ┗ tsconfig.json
Creating Node.js project
Let’s get started on creating the project. Open the SimpleNotes folder in the VSCode. Once you are in VSCode, go to Terminal Window.
Change the working directory to the server. We will execute our commands from the server folder.
CD server
To create a new node project, we will execute the following command. -y flag accepts the default values while creating the package.json file.
npm init -y
Configuring TypeScript
TypeScript is a superset of JavaScript. It offers all the features of Javascript in addition to compile-time checks. We will use TypeScript to develop our application. We need to install TypeScript dependency and configure our node project with TypeScript.
npm install -D typescript
The -D or --save-dev flag will install the package as a dev dependency. Packages installed with this flag will not be required to run the application in production.
Create tsconfig.json file using tsc command. This tsconfig.json allows you to specify root files and different compiler options required to compile the typescript project.
tsc init
Here is the tsconfig.json with the configuration required to compile and run our application.
{
  "compilerOptions": {
    "allowJs": true,
    "module": "commonjs",
    "moduleResolution": "node",
    "pretty": true,
    "sourceMap": true,
    "target": "es2017",
    "outDir": "./dist",
    "lib": ["es6"],
    "resolveJsonModule": true,
    "types": ["node"],
    "typeRoots" : ["./node_modules/@types", "./src/@types"],
    "experimentalDecorators": true,
    "emitDecoratorMetadata": true,
    "esModuleInterop": true
  },
  "include": [
    "src/**/*.ts",
  ],
  "exclude": [
    "node_modules",
  ]
}
Installing Dependency Packages
Now it is time to install dependency packages that are needed for our application. Run the following command to install npm packages.
npm i apollo-server-express dotenv express graphql
npm i mongoose reflect-metadata type-graphql @typegoose/typegoose
apollo-server-express- This is the Apollo GraphQL Server with Express.dotenv- Dotenv module loads environment variables from a .env file into process.env.express- Express is a minimal and flexible Node.js web application framework.graphql- Implementation of GraphQL for creating APIs.mongoose- Mongoose is an Object Data Modeling (ODM) library for MongoDB and Node.js.reflect-metadata- This allows you to perform runtime reflection on types.type-graphql- Create GraphQL schema and resolvers with TypeScript, using classes and decorators.@typegoose/typegoose- This allows you to define Mongoose models using TypeScript classes.
In the next step, we will install npm packages as dev dependencies. These packages are only used for development purposes. We will install few utility packages and typescript definition packages. These typescript definition files help the typescript compiler in type checking and also to understand the structure of their respective javascript npm packages (e.g express, graphql).
npm i -D @types/express @types/graphql @types/mongodb @types/mongoose @types/node
npm i -D nodemon ts-node
nodemon- Automatically restarting the node application when file changes in the directory are detected.ts-node- Run typescript files directly, without the need for precompilation using tsc
Mongoose Schema and GraphQL Schema
In this section, we will create Mongoose Schema and GraphQL Schema. Mongoose Schema will interact with the MongoDB database. We will be using GraphQL Schema in our Resolvers to create endpoints using Apollo-Server.
Create a new file notes.model.ts under src\models folder. We use the following code to create our Model for Notes. This Notes class has properties like id, title, description, backgroundcolor, etc.
We use the Typegoose library which acts as a wrapper for easily writing Mongoose models with TypeScript. The @Prop (@Property) decorator is used for defining the properties for our mongoose schema.
We use the Type-GraphQL library to create our GraphQL schema. @ObjectType and @Field decorators are used for defining properties for Notes GraphQL Schema.
By using Typegoose and Type-GraphQL packages, we eliminate the duplication of code for writing models and schemas separately for MongoDB and GraphQL. We use one single model notes.model.ts which acts as a bridge between MongoDB and GraphQL.
import { prop as Property, getModelForClass, modelOptions } from '@typegoose/typegoose';
import { Field, ObjectType, ID } from 'type-graphql';

@ObjectType({ description: 'The Notes Model' })
@modelOptions({ schemaOptions: { collection: 'notes', timestamps: true } })
export class Notes {
  @Field(() => ID)
  id: string;

  @Field()
  @Property({ type: () => String, required: true })
  title: string;

  @Field()
  @Property({ type: () => String, required: true })
  description: string;

  @Field({ nullable: true })
  @Property({ type: String, required: false })
  backgroundColor: string;

  @Field({ nullable: true })
  @Property({ type: Boolean, required: false })
  isArchived: boolean;

  @Field()
  @Property({ required: true, default: Date.now })
  createdAt: Date;

  @Field()
  @Property({ required: true, default: Date.now })
  updatedAt: Date;
}

export const NotesModel = getModelForClass(Notes);
GraphQL Resolvers
Now it is time to create our notes resolver. Resolver is a collection of functions that helps to retrieve field data (Query) and update data in the database (mutation). In our notes resolver we will implement following Queries and Mutations.
-
Queries
- getAllNotes()
- getNotesById()
-
Mutations
- createNotes()
- updateNotes()
- deleteNotes()
Lets start the resolver implementation by creating a file notes.resolvers.ts in src\resolvers folder.
import { Resolver, Mutation, Arg, Query, ID } from 'type-graphql';
import { NotesModel, Notes } from '../models/notes.model';
import { NotesInput } from './types/notes-input';

@Resolver((_of) => Notes)
export class NotesResolver {
  @Query((_returns) => Notes, { nullable: false, name: 'notes' })
  async getNotesById(@Arg('id') id: string) {
    return await NotesModel.findById({ _id: id });
  }

  @Query(() => [Notes], { name: 'notesList', description: 'Get List of Notes' })
  async getAllNotes() {
    return await NotesModel.find();
  }

  @Mutation(() => Notes, { name: 'createNotes' })
  async createNotes(@Arg('newNotesInput') { title, description, backgroundColor }: NotesInput): Promise<Notes> {
    const notes = (
      await NotesModel.create({
        title,
        description,
        backgroundColor,
        isArchived: false,
      })
    ).save();

    return notes;
  }

  @Mutation(() => Notes, { name: 'updateNotes' })
  async updateNotes(
    @Arg('editNotesInput') { id, title, description, backgroundColor, isArchived }: NotesInput
  ): Promise<Notes> {
    const notes = await NotesModel.findByIdAndUpdate(
      { _id: id },
      {
        title,
        description,
        backgroundColor,
        isArchived,
      },
      { new: true }
    );

    return notes;
  }

  @Mutation(() => String, { name: 'deleteNotes' })
  async deleteNotes(@Arg('id') id: string): Promise<String> {
    const result = await NotesModel.deleteOne({ _id: id });

    if (result.ok == 1) return id;
    else return '';
  }
}
We use @Resolver, @Query, and @Mutation directives from the TypeGraphQL package to create our GraphQL schema (schema.gql).
For createNotes and updateNotes mutations, we use NotesInput type as the input paramter. This NotesInput contains the data for creating and editing the notes.
Create a new file notes-input.ts in the src\resolvers\types folder.
import { Field, InputType, ID } from 'type-graphql';
import { Notes } from '../../models/notes.model';

@InputType()
export class NotesInput implements Partial<Notes> {
  @Field(() => ID, { nullable: true })
  id: string;

  @Field()
  title: string;

  @Field()
  description: string;

  @Field({ nullable: true })
  backgroundColor: string;

  @Field({ nullable: true })
  isArchived: boolean;
}
Mongo Database Setup
We have created models and resolvers for Notes. We now have to create a mongo database. For this tutorial, we will use the cloud infrastructure provided by MongoDB and create a free-tier database. Here are the steps for creating a database.
- Sign-up for an account at https://account.mongodb.com/account/login
- Create a new
Clusterunder the free-tier category. - Create a new
Collectionand name it asnotes. - Create a db user (
dbUser) under database access and assign read-write permissions to the database. - Note down the
usernameandpasswordcreated for the database user. - Under
Network access, allow your current IP address to connect to the database cluster.
We are now set with our Mongo database ready to be used with our GraphQL server. We will use the following connection string format within our code for mongoDB.
mongodb+srv://dbUser:<password>@<clusterName>.mongodb.net/<DatabaseName>?retryWrites=true&w=majority
Environment Configuration
We need to store our variables like username, password, port numbers, etc. We store that in an environment file (.env). In our application, we use Dotenv module that loads environment variables from a .env file into process.env.
Create a new file .env at the root of the server folder. Make sure that you DO NOT check in this file to the Github.
Here is our .env file looks like.
DB_USERNAME=<db User created for MongoDB>
DB_PASSWORD=<password>
DB_NAME=notes
PORT=<portnumber (3333)>
Node.js Server Setup
In this section we will write the code to setup our node.js server. We have all the available assets like models, resolvers, mongodb, configuration etc. We will wire up all these and start our node.js server using apollo-server and express modules.
Create index.ts under server\src folder and use the following code to setup our node.js server.
import { ApolloServer } from 'apollo-server-express';
import Express from 'express';
import 'reflect-metadata';
import { buildSchema } from 'type-graphql';
import { connect } from 'mongoose';
import * as dotenv from 'dotenv';

//Resolvers
import { NotesResolver } from './resolvers/notes.resolvers';

const executeMain = async () => {
  dotenv.config();

  const schema = await buildSchema({
    resolvers: [NotesResolver],
    emitSchemaFile: true,
    validate: false,
  });

  const mongoose = await connect(
    `mongodb+srv://${process.env.DB_USERNAME}:${process.env.DB_PASSWORD}@<CLUSTERNAME>.mongodb.net/${process.env.DB_NAME}?retryWrites=true&w=majority`,
    { useNewUrlParser: true, useUnifiedTopology: true }
  );

  await mongoose.connection;

  const server = new ApolloServer({ schema: schema });
  const expressServer: Express.Application = Express();

  server.applyMiddleware({ app: expressServer });

  expressServer.listen({ port: process.env.PORT }, () =>
    console.log(`Server ready and listening at ==> http://localhost:${process.env.PORT}${server.graphqlPath}`)
  );
};

executeMain().catch((error) => {
  console.log(error, 'error');
});
Following are the steps which we follow to initiate our node.js server.
- Load our
environment variableslike dbuser, password, ports, etc intoprocess.env. - Build our
GraphQLschema usingbuildSchemafromtype-graphqlmodule. - Connect to
mongoDBusingconnectfrommongoosemodule. - Create an instance of
Apollo-ServerandExpressserver - Connect
Apollo-Serverto theHTTPframework such asExpressusingApplyMiddleware. - Start
Expressserver usinglistencommand. - Once we start the server, we should see a message
Server ready and Listening at the <PORT>on the terminal window.
In the above code, we build the GraphQL schema using buildSchema and pass emitSchemaFile = true as parameter. This setting will create a schema.gql file when the node.js server is started.
Config files
To start of node.js server, we need config files like package.json and nodemon.json.
package.json
The package.json has the configuration like dependencies packages, name, author, version scripts, etc. We define the start command in the scripts section. We use nodemon package in the start command to start our server and watch for any file changes. We start our node.js server by executing npm start from the terminal window.
{
  "name": "simple notes backend-server",
  "version": "1.0.0",
  "description": "",
  "main": "index.js",
  "scripts": {
    "start": "nodemon",
    "test": "echo \"Error: no test specified\" && exit 1"
  },
  "keywords": [],
  "author": "Author Name",
  "license": "ISC",
  "dependencies": {
    "@typegoose/typegoose": "^7.6.0",
    "apollo-server-express": "^2.24.0",
    "dotenv": "^9.0.0",
    "express": "^4.17.1",
    "graphql": "^15.5.0",
    "mongoose": "^5.12.7",
    "reflect-metadata": "^0.1.13",
    "type-graphql": "^1.1.1"
  },
  "devDependencies": {
    "@types/express": "^4.17.11",
    "@types/graphql": "^14.5.0",
    "@types/mongodb": "^3.6.12",
    "@types/mongoose": "^5.10.5",
    "@types/node": "^15.0.2",
    "nodemon": "^2.0.7",
    "ts-node": "^9.1.1",
    "ts-node-dev": "^1.1.6",
    "typescript": "^4.2.4"
  }
}
nodemon.json configuration
nodemon is a tool that helps develop node.js based applications by automatically restarting the node application when file changes in the directory are detected.
{
    "watch": ["src", "bin"],
    "ext": ".ts,.js",
    "ignore": [],
    "exec": "ts-node --transpile-only ./src/index.ts"
}
Running node.js / Server
We are done with our development and configuration. It is time to start our server and execute some queries.
Go to the Terminal window and navigate to the server folder. Execute npm start command. You will see that the typescript code will be transpiled and start our node.js server. Once the server is started, you should see the following message in your terminal window.
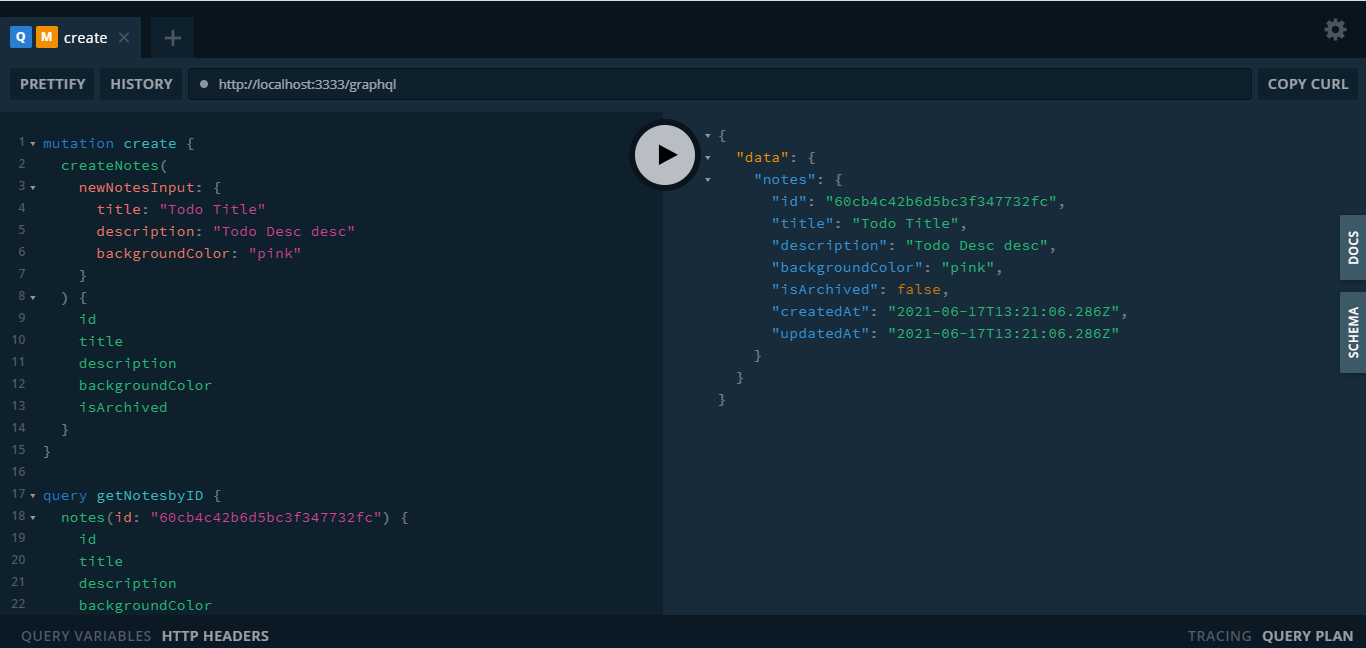
Server ready and listening at ==> http://localhost:3333/graphql
Here is our GraphQL implementation in the browser.
In the next tutorial, we are going to implement Client using React framework and consume our GraphQL endpoint to create our Simple Notes app. Stay tuned for the update.
Keep Hacking :-)